
안녕하세요! 개발자 최영철입니다.
이번 포스트에서는 이전 포스트에서 못다했던 User와 GuestBook 중 User 모델을 디자인하고 이에 대한 API를 구현한 이야기를 하려고 합니다.
목차
1. User 모델 구현
Django는 기본적으로 제공하는 User 모델이 있습니다.
django.contrib.auth.models.User
위 모델은 다음과 같이 이루어져 있습니다:
class AbstractUser(AbstractBaseUser, PermissionsMixin):
    username_validator: UnicodeUsernameValidator = ...

    username = models.CharField(max_length=150)
    first_name = models.CharField(max_length=30, blank=True)
    last_name = models.CharField(max_length=150, blank=True)
    email = models.EmailField(blank=True)
    is_staff = models.BooleanField()
    is_active = models.BooleanField()
    date_joined = models.DateTimeField()

    EMAIL_FIELD: str = ...
    USERNAME_FIELD: str = ...
    def get_full_name(self) -> str: ...
    def get_short_name(self) -> str: ...
    def email_user(
        self, subject: str, message: str, from_email: str = ..., **kwargs: Any
    ) -> None: ...

class User(AbstractUser):
    objects: UserManager[User]
기본으로 제공하는 모델을 사용해도 되지만 커스텀이 라이브러리를 건드리지 않는 이상 사실상 불가능 합니다. 해당 프로젝트의 경우 로그인을 구글과 카카오 계정을 통한 OAuth 2.0으로 구현합니다. 따라서 User 모델에 social_type 필드를 만들어 같은 이메일이 중복이라도 social_type에 따라 유저를 구별할 것이고 nickname 필드를 만들어 백엔드에서 프론트엔드에게 유저의 닉네임을 보내줄 것입니다.
그래서 다음과 같이 커스텀 유저 모델을 만들었습니다.
from django.db import models
from django.contrib.auth.models import AbstractUser

class User(AbstractUser):
    username = None
    password = None
    first_name = None
    last_name = None
    is_staff = None
    last_login = None
    is_superuser = None
    USERNAME_FIELD = 'id'
    REQUIRED_FIELDS = []

    email = models.EmailField()
    nickname = models.CharField(max_length=100, unique=False)
    social_type = models.CharField(max_length=10, null=True)
USERNAME_FIELD를 id로 바꿔준 이유는 해당 프로젝트에서 unique할 요소가 Primary Key인 id밖에 없기 때문입니다.
이렇게 User 모델을 만들게 되면 현재 Django에는 다음과 같은 DB Schema를 갖습니다.

date_joined의 경우는 처음 로그인 했을 때 해당하는 정보의 유저가 없으면 유저를 생성하는데 그 생성 날짜를 자동으로 기록하는 필드입니다.
이렇게 유저를 생성, 삭제 등 관리할 수 있게 됐으니 이를 통해 OAuth 2.0 로그인 기능을 구현해봅시다.
2. OAuth 2.0
OAuth 2.0의 흐름은 다음과 같습니다.
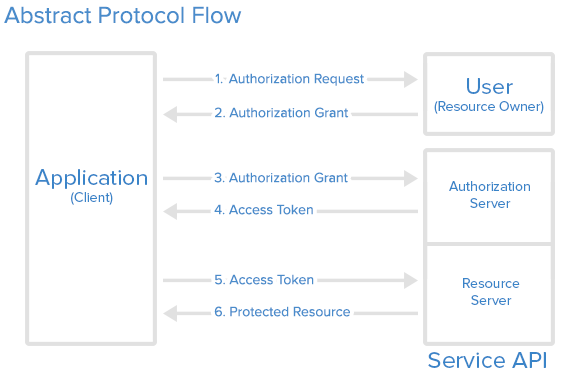
해당 프로젝트에서 사용된 로그인 흐름을 구글의 경우로 예를 들겠습니다.
(카카오의 경우 인가 코드 -> access token -> 유저 정보의 순서로 한 번의 과정이 추가되어있습니다.)
1. 유저가 로그인을 요청합니다.
2. 클라이언트(프론트엔드)는 구글 서버로 access token을 받고 처리할 클라이언트 주소인 redirect_uri와 client_id, 구글에서 받을 정보의 scope를 Query parameter로 사용자를 리다이렉트 시킵니다.
3. 구글은 사전에 등록한 redirect_uri와 client_id가 맞는지 확인한 후 맞다면 로그인을 시킵니다.
4. 로그인이 완료되면 구글은 해당 유저의 데이터를 받을 수 있는 access token을 해시로 포함시킨 채 redirect_uri로 리다이렉트 합니다.
5. access token을 처리하는 페이지로 리다이렉트된 클라이언트는 받은 access token을 API를 통해 백엔드에게 보냅니다.
6. 백엔드는 access token을 가지고 구글에게 유저 정보를 요청하고 만약 성공적으로 response를 받았다면 받은 정보를 가지고 해당 유저가 DB에 있는지 검색하고 없다면 새로운 유저를 만듭니다.
7. 유저 id를 JWT을 통해 SECRET KEY와 HS256로 암호화한 뒤 프론트엔드에서 필요한 정보와 함께 보냅니다.
8. 클라이언트는 status code가 200이면 받은 데이터를 쿠키에 저장하고 오류가 발생한다면 아무것도 하지 않은 채 메인 페이지로 리다이렉트 합니다.
이렇게 저장된 쿠키는 클라이언트가 해당 유저가 로그인 되어있는지 확인하고 토큰을 통해 백엔드와 교신할 때 사용됩니다.
다음은 프로젝트에서 구현된 구글 OAuth 코드입니다.
//App.js (Router)
import React from 'react';
import {
  BrowserRouter,
  Routes,
  Route,
} from "react-router-dom";
import Main from "./Main";
import GoogleAuthCallback from './google_login';
import Login from './login';
import KakaoAuthCallback from './kakao_login';
import ProjectUploader from './proj_upload';
import { CookiesProvider } from 'react-cookie';

function App() {

  return (
    <CookiesProvider>
    <BrowserRouter>
      <Routes>
        <Route path="/" element={<Main />} />
        <Route path="api/v2/google/login/callback" element={<GoogleAuthCallback /> } />
        <Route path="api/v2/kakao/login/callback" element={<KakaoAuthCallback /> } />
      </Routes>
    </BrowserRouter>
    </CookiesProvider>
  );
}

export default App;
//login.js
import React from "react";
import { GoogleLoginButton, createButton, createSvgIcon } from "react-social-login-buttons";
function Login () {
const google_auth_uri = 'https://accounts.google.com/o/oauth2/v2/auth'
const scope = "https://www.googleapis.com/auth/userinfo.email+https://www.googleapis.com/auth/userinfo.profile"
const google_redirect = 'http://localhost:3000/api/v2/google/login/callback'
const google_uri = `${google_auth_uri}?client_id=${process.env.REACT_APP_GOOGLE_CLIENT_ID}&redirect_uri=${google_redirect}&response_type=token&scope=${scope}`
const googlePage = () => {
window.location.assign(google_uri)
}
return (
<div>
<div style={{'textAlign': 'center', 'fontSize': '30px'}}>로그인<br/><br/></div>
<GoogleLoginButton onClick={googlePage}>구글로 로그인</GoogleLoginButton>
</div>
)
}
export default Login//google_login.js (Callback Page)
import axios from "axios";
import React, { Component, useContext, useEffect } from "react";
import { useNavigate, useSearchParams } from "react-router-dom";
import styled from "styled-components";
import { useCookies } from 'react-cookie';
function GoogleAuthCallback () {
const [cookies, setCookie] = useCookies(['userInfo'])
const navigate = useNavigate()
const hash = window.location.hash
useEffect(() => {
if (hash == null || hash == '') {
navigate('/')
} else {
const access_token = hash.split('=')[1].split('&')[0]
const fetchUserData = async() => { axios.post(
'http://localhost:8000/users/api/v2/auth/google',
{
'access_token': access_token,
}
).then((response) => {
const data = response.data
const { access_token, nickname, isAdmin } = data
const expiresIn = Date.now() * 0.001 + 3600
setCookie("userInfo", { token: access_token, nickname, isAdmin, expiresIn }, { path: '/', maxAge: 3600 })
navigate('/')
return
}).catch(() => {
alert('Login Failed')
navigate('/')
return
})
}
fetchUserData()
}
}, [])
return (
<div>Redirecting...</div>
)
}
export default GoogleAuthCallback#tokens.py
from .models import User
import jwt
from my_settings import SECRET_KEY
class TokenManager:
@classmethod
def generate_token(cls, user):
user_id = user if type(user) == int else user.id
user_data = {'user_id': user_id}
token = jwt.encode(user_data, SECRET_KEY, 'HS256')
return token
#...
#Login with access token (Backend)
from rest_framework.views import APIView
from rest_framework.response import Response
from .models import User
import requests
from .tokens import TokenManager
class GoogleAuthView(APIView):
def post(self, request):
try:
data = request.data
if 'access_token' in data:
google_info_resp = requests.get(
"https://www.googleapis.com/oauth2/v3/userinfo",
params={
'access_token': data['access_token']
}
)
if not google_info_resp.ok:
raise
info = google_info_resp.json()
user, _ = User.objects.get_or_create(
email = info['email'],
social_type = 'google',
)
nickname = user.nickname
if nickname != info['name']:
user.nickname = info['name']
user.save()
token = TokenManager.generate_token(user=user.id)
result = {
'access_token': token,
'nickname': info['name'],
}
if user.groups.filter(name='admin').exists():
result['isAdmin'] = True
return Response(result)
else:
raise
except Exception as e:
return Response('Authentication failed {}'.format(e), status=403)다시 OAuth 흐름을 정리하자면
클라이언트 Login -> 구글 로그인 -> 클라이언트 GoogleAuthCallback -> 서버 GoogleAuthView ->
클라이언트 메인 페이지
입니다.
3. 마무리
이렇게 해서 Django의 User 모델의 구현과 이를 활용한 프론트엔드와 백엔드의 OAuth 2.0 로그인 방법을 구현했습니다.
OAuth 2.0의 원리를 제대로 이해하고 적용시켜볼 수 있는 시간이었습니다.
다음에는 방명록 모델인 GuestBook 모델과 React에서 방명록 목록을 가져오고 나타내는 방법에 대해 설명하겠습니다.
'FE & BE' 카테고리의 다른 글
| 6. 방명록 프론트엔드 구현 [MyHomepage: 개인 홈페이지 만들기] (0) | 2022.11.17 |
|---|---|
| 5. React Hook과 방명록 백엔드 구현 [MyHomepage: 개인 홈페이지 만들기] (0) | 2022.11.16 |
| 4. React 모달창 구현 + Styled Components [MyHomepage: 개인 홈페이지 만들기] (0) | 2022.11.15 |
| 2. 홈페이지 기획, AWS S3, Project 모델 구성 [MyHomepage: 개인 홈페이지 만들기] (0) | 2022.11.15 |
| 1. 프레임워크 결정 + React 기본 문법 [MyHomepage: 개인 홈페이지 만들기] (0) | 2022.11.15 |


댓글